
Imagine pulling a tray of golden-brown, impossibly fluffy biscuits from the oven in under 30 minutes. No yeast, no complicated folding, and no stress. That’s the magic of these 7-Up Biscuits with Bisquick. This legendary recipe has been a secret weapon for home cooks for decades, and for good reason.
With just four simple ingredients, you can create biscuits with crispy, buttery bottoms and a soft, tender interior that rivals any from-scratch version. Whether you’re whipping up a quick, need a side for weeknight dinner, or are crafting the ultimate base for biscuits and gravy, this recipe is your new go-to for effortless, delicious results.
Why This Recipe Works
- Four-Ingredient Simplicity: By leveraging the power of Bisquick, this recipe eliminates the need to measure flour, leavening agents, and salt separately. The addition of sour cream and 7-Up creates a chemical reaction that guarantees a fantastic rise and tender crumb.
- The Secret to Flakiness: The carbonation in the 7-Up soda acts as an extra leavening agent, creating tiny air pockets in the dough. Combined with the fat from the sour cream and butter, this results in a uniquely light and fluffy texture that’s simply irresistible.
- The Butter-Bath Method: Baking the biscuits in a pool of melted butter isn’t just for flavor. It fries the bottoms as they bake, giving them an incredibly crispy, golden crust that contrasts perfectly with the soft interior.
- Unbeatable Speed: From bowl to table in 22 minutes, these biscuits are the ultimate solution for when you need a homemade bread component in a hurry.
Ingredients for 7-Up Biscuits with Bisquick
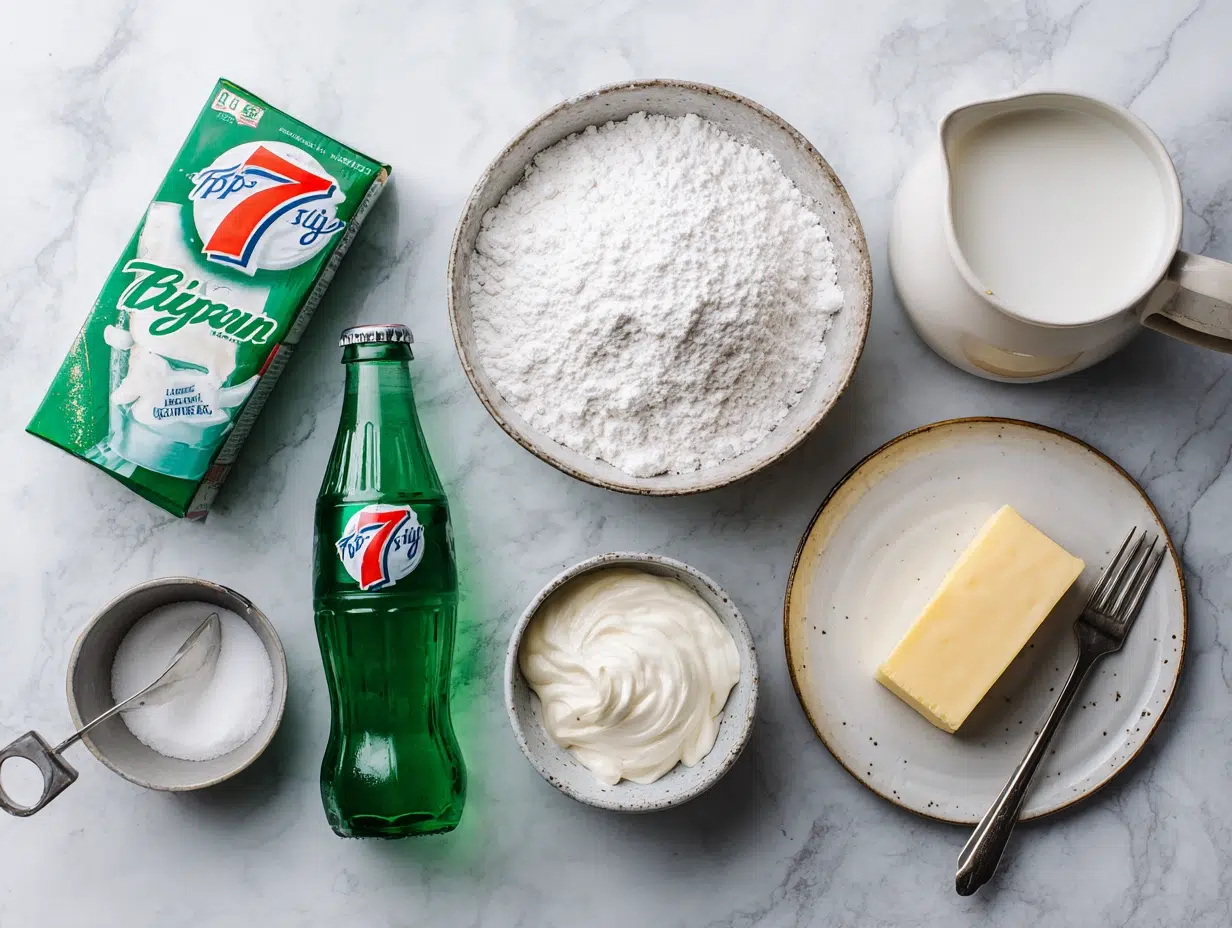
- 2 cups Bisquick baking mix
- 1/2 cup full-fat sour cream (cold)
- 1/2 cup 7-Up soda (cold)
- 1/4 cup butter, melted
Ingredient Notes & Substitutions:
- Bisquick: This is the cornerstone of the recipe. A generic “baking mix” will work as a direct substitute.
- Sour Cream: Full-fat, cold sour cream is crucial for the best texture. Greek yogurt can be used in a pinch, but the tang and fat of sour cream are ideal.
- 7-Up: Any clear, lemon-lime soda will work, including Sprite or Sierra Mist. The key is the carbonation.
- Butter: Salted or unsalted butter works fine. For a richer flavor, you can use half butter and half bacon drippings.
How to Make the Best 7-Up Biscuits with Bisquick: A Step-by-Step Guide
Step 1: Preheat and Prepare Preheat your oven to a hot 450°F (230°C). This high heat is essential for getting a good rise and a golden top. Pour the 1/4 cup of melted butter into a 9×9-inch baking dish, ensuring the bottom is evenly coated.
Step 2: Combine the Base In a large mixing bowl, add the 2 cups of Bisquick and the 1/2 cup of cold sour cream. Use a fork or pastry cutter to blend them together until the mixture resembles coarse crumbs. The sour cream will create a shaggy, clumpy mixture—this is exactly what you want.
Step 3: Add the Secret Ingredient Now, slowly pour the 1/2 cup of cold 7-Up into the bowl. Gently stir with a spatula or wooden spoon just until the liquid is incorporated and a soft, sticky dough forms. Do not overmix! Overworking the dough is the primary cause of tough biscuits. A few dry streaks are okay.
Step 4: Shape the Dough Generously sprinkle a clean countertop or cutting board with additional Bisquick. Turn the soft dough out onto the surface. Sprinkle a little more Bisquick on top of the dough. With your hands, gently pat the dough (do not roll) until it’s about 1-inch thick.
Step 5: Cut the Biscuits Dip a 2.5 to 3-inch biscuit cutter (or the rim of a glass) into some Bisquick to prevent sticking. Press straight down into the dough to cut out rounds. Avoid twisting the cutter, as this seals the edges and can prevent the biscuits from rising properly. Re-pat the scraps to cut out more biscuits.
Step 6: The Butter Bath and Bake Place the biscuit rounds directly into the baking dish with the melted butter. You should hear a gentle sizzle. Bake for 10-12 minutes, or until the tops are a deep golden brown.
Step 7: Serve and Enjoy! Remove the biscuits from the oven. For an extra buttery finish, you can brush the tops with the melted butter from the pan. Serve immediately while they are warm and fluffy!
Serving & Storage

Serving Suggestions: These biscuits are incredibly versatile.
- Breakfast: Serve warm with butter, honey, jam, or as a base for Easy Swedish Pancakes.
- Dinner: The perfect side for soups, stews, or fried chicken.
- The Ultimate Comfort Food: Smother them in savory sausage gravy for a classic biscuits and gravy dish.
Storage Instructions:
- Countertop: Store leftover biscuits in an airtight container at room temperature for up to 2 days.
- Reheating: To restore their freshness, warm them in a 350°F (175°C) oven for 5-10 minutes or in the air fryer for 3-4 minutes. Microwaving will make them soft but can sacrifice the crispy texture.
- Freezing: These biscuits freeze beautifully. Once completely cool, place them in a freezer-safe bag for up to 3 months. Reheat from frozen in the oven.
FAQ
1. Can I use a different soda? Yes, any clear, carbonated lemon-lime soda like Sprite will work identically. Some even experiment with ginger ale for a slightly different flavor profile.
2. My dough is very sticky. What did I do wrong? This is normal! The dough is meant to be soft and sticky. Use plenty of extra Bisquick on your hands and work surface when patting it out. A sticky dough often leads to a more tender biscuit.
3. Why are my biscuits dense and not fluffy? The most common cause is overmixing the dough after adding the 7-Up. Mix just until combined. Another cause could be using warm sour cream or soda, which affects the rise.
4. Can I make these biscuits ahead of time? You can prepare the dough, cut the biscuits, and place them in the buttered baking dish. Cover tightly and refrigerate for up to 4 hours before baking. You may need to add 1-2 minutes to the baking time.
5. How do these compare to traditional buttermilk biscuits? These are quicker and more foolproof because the leavening is handled by the Bisquick and soda. They are incredibly tender and fluffy but have a slightly different, more cake-like crumb compared to the distinct flaky layers of a laminated buttermilk biscuit.
Conclusion
These 7-Up Biscuits with Bisquick are more than just a recipe; they’re a lifesaver for busy home cooks who refuse to compromise on taste. They prove that you don’t need a pantry full of ingredients or hours of time to create a truly memorable homemade baked good. The stunning contrast between the crispy, buttery bottom and the cloud-like interior is an experience everyone should have.
So, the next time you’re planning a cozy breakfast of Cinnamon Belgian Waffles or a hearty dinner, remember this simple formula. In just 22 minutes, you can have a batch of warm, comforting biscuits on the table that will have your family asking for seconds.
Try This Recipe Today!
Make these unbelievably easy 7-Up Biscuits with Bisquick part of your culinary repertoire. If you give them a try, leave a comment and a star rating below to let me know how they turned out! Don’t forget to share your beautiful creations on Instagram or Facebook and tag me. I love seeing what you make!